Introduction to Trolling Motors and Kayaks
As an avid kayaker and fishing enthusiast, I have always been on the lookout for ways to enhance my experience on the water. One day, while browsing through a fishing magazine, I stumbled upon an article about mounting a trolling motor on a kayak. Intrigued by the idea of increased speed and efficiency, I decided to delve deeper into this topic.
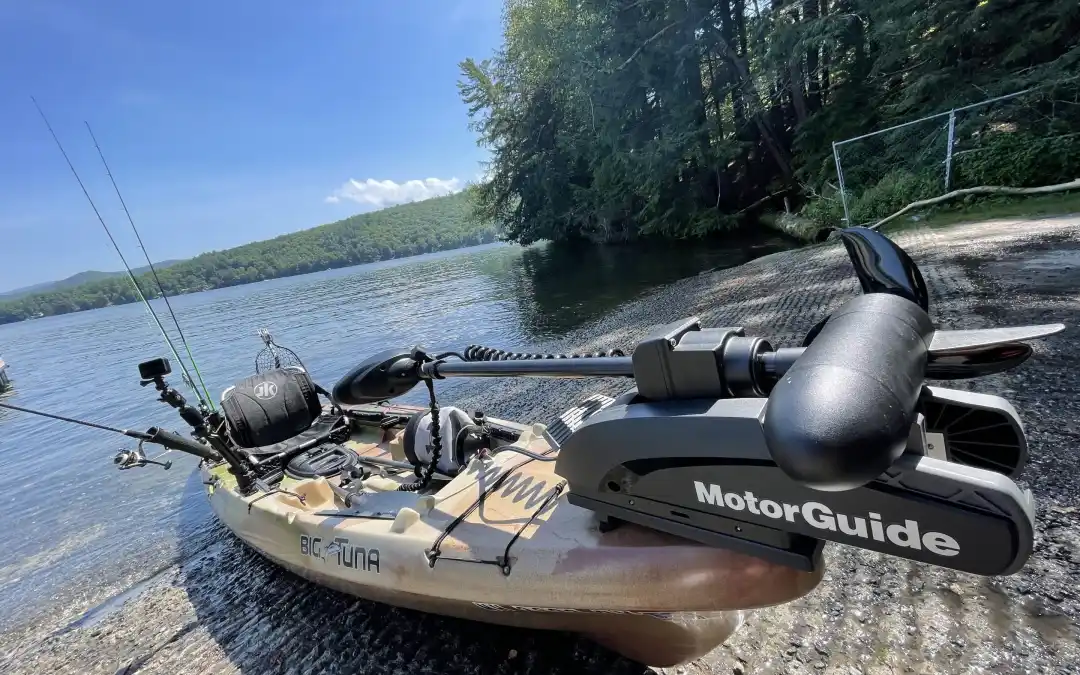
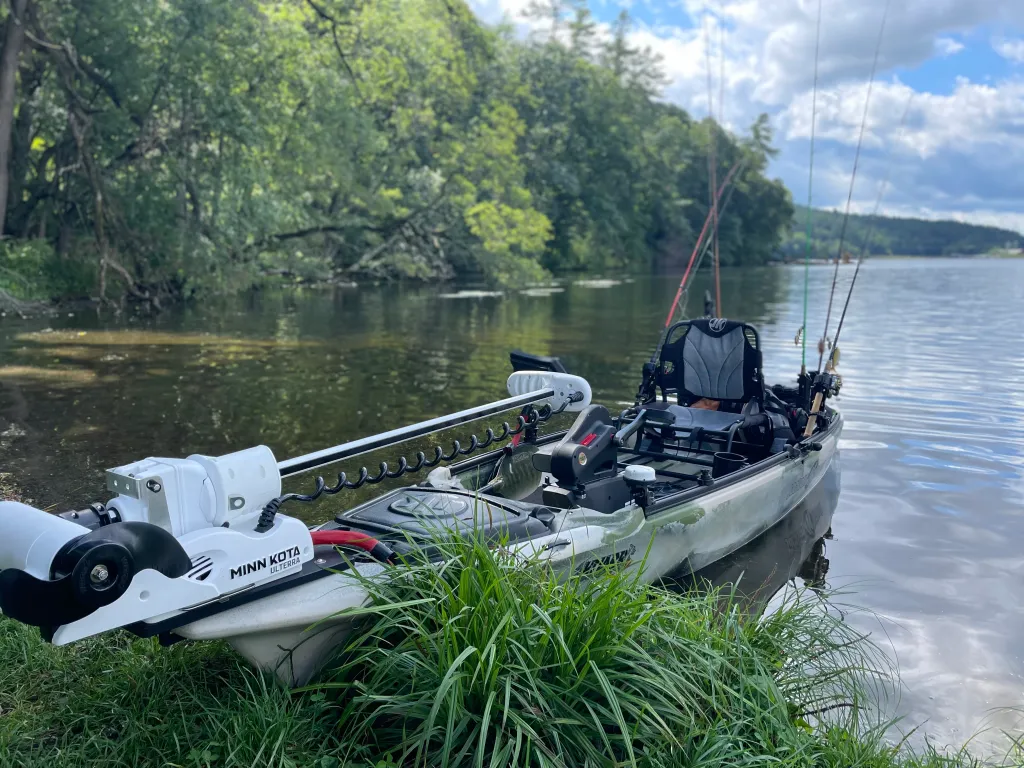
Trolling motors are electric motors specifically designed for use in small watercraft such as kayaks. They are typically mounted at the stern or bow of the kayak and provide propulsion by rotating a propeller underwater. These motors are controlled by a hand-held device that allows you to adjust speed and direction effortlessly.
Kayaks, on the other hand, are lightweight and versatile watercraft that have gained immense popularity among outdoor enthusiasts in recent years. Whether you enjoy fishing in calm lakes or exploring winding rivers, kayaks offer an intimate connection with nature while providing maneuverability in even the tightest spaces.
Benefits of Mounting a Trolling Motor on Your Kayak

The decision to mount a trolling motor on my kayak has revolutionized my time spent out on the water. Here are some of the key benefits I have experienced:
Increased speed and efficiency: By adding a trolling motor to my kayak, I can now effortlessly glide through the water at higher speeds than ever before. This not only saves me time but also allows me to cover more ground during each outing.
Ability to cover more water: With traditional paddling alone, it can be challenging to explore vast bodies of water within limited timeframes. However, with a trolling motor assisting me along the way, I am able to venture further into uncharted territories without worrying about fatigue or time constraints.
Reduced fatigue for the kayaker: Paddling for extended periods can be physically demanding and exhausting. By incorporating a trolling motor into my setup, I no longer need to rely solely on my own strength to propel the kayak. This has significantly reduced fatigue, allowing me to enjoy longer fishing trips without feeling drained.
Improved fishing experience: Fishing from a kayak is already an incredible experience, but with the addition of a trolling motor, it has become even more enjoyable. The ability to effortlessly maneuver and position myself in prime fishing spots has greatly increased my chances of success. I can now focus more on casting and reeling in fish rather than worrying about paddling against currents or wind.
Tools and Materials Required for the DIY Project
Before embarking on this DIY project, it is essential to gather all the necessary tools and materials. Here is a comprehensive list of what you will need:
1. Trolling motor: Choose a motor that suits your kayak’s size and weight capacity. Consider factors such as thrust power, battery life, and control options when making your selection.
2. Mounting bracket: This bracket serves as the connection point between your trolling motor and kayak. Ensure that it is compatible with both your motor and kayak model.
3. Screws or bolts: Depending on your mounting bracket’s design, you will need screws or bolts to secure it firmly onto your kayak.
4. Drill with appropriate drill bits: A drill will be required for creating holes in your kayak for mounting purposes.
5. Wrenches or pliers: These tools are necessary for tightening screws or bolts during installation.
6. Wiring kit: To connect the trolling motor to a battery source, you will need a wiring kit that includes wires, connectors, fuses, switches, and terminals.
7. Battery box: A waterproof battery box is crucial for protecting your battery from water damage while out on the water.
8. Marine-grade adhesive/sealant: Use marine-grade adhesive/sealant to ensure watertight connections between components such as brackets or wiring entry points into the hull of your kayak.
Step-by-Step Guide to Mounting a Trolling Motor on Your Kayak

Now that we have gathered all the necessary tools and materials, let’s dive into the step-by-step process of mounting a trolling motor on your kayak. Follow these instructions carefully for a successful installation:
Step 1: Choosing the Right Trolling Motor for Your Kayak
Before proceeding with any installation, it is crucial to select a trolling motor that suits your kayak’s specifications. Consider factors such as thrust power, battery life, control options, and weight capacity. Take into account the size and weight of your kayak to ensure optimal performance.
There are various types of trolling motors available in the market, including bow-mounted motors and stern-mounted motors. Bow-mounted motors provide better maneuverability and control but may require additional modifications to your kayak’s structure. Stern-mounted motors are easier to install but may affect steering capabilities.
Step 2: Preparing Your Kayak for the Trolling Motor Installation
To ensure a smooth installation process, it is essential to prepare your kayak beforehand. Start by thoroughly cleaning and drying both the interior and exterior surfaces of your kayak. This will help remove any dirt or debris that could interfere with proper mounting.
Next, measure and mark the desired location for mounting your trolling motor bracket. Consider factors such as balance, weight distribution, ease of access to controls while seated in the kayak when determining this position.
Step 3: Installing the Trolling Motor Mounting Bracket
With your marked location ready, it’s time to install the trolling motor mounting bracket onto your kayak:
1. Position the bracket according to your markings.
2. Use screws or bolts (depending on what is provided with your bracket) to secure it firmly onto your kayak.
3. Ensure proper alignment by double-checking measurements before tightening all fasteners securely.
4. Test stability by applying gentle pressure in different directions; if there is any movement or flexing observed at this stage – readjust and tighten accordingly.
Step 4: Attaching the Trolling Motor to the Mounting Bracket
Now that your mounting bracket is securely in place, it’s time to attach the trolling motor:
1. Align the motor’s mounting holes with those on your bracket.
2. Insert screws or bolts through both sets of holes.
3. Tighten all fasteners securely using wrenches or pliers, ensuring that the motor is firmly attached to the bracket.
Adjusting the angle and direction of your trolling motor can be done by loosening specific screws or knobs on its mount. Experiment with different positions until you find one that suits your needs best.
Step 5: Wiring the Trolling Motor to Your Kayak’s Battery
To power your trolling motor, you will need to connect it to a battery source using a wiring kit:
1. Begin by connecting wires from your trolling motor’s control unit (usually located near its handle) to corresponding terminals on a switch panel or fuse box mounted within easy reach while seated in your kayak.
2. Connect wires from this switch panel/fuse box directly onto terminals of an appropriately sized marine battery (ensure proper polarity).
3. Securely mount this battery inside a waterproof battery box within easy reach but away from areas prone to water splashes.
4. Use marine-grade adhesive/sealant around any entry points where wiring passes through kayak hulls for watertight connections.
Once all connections are made, test your setup by turning on both switch panel/fuse box and trolling motor controls simultaneously – ensure smooth operation without any sparks or unusual noises before proceeding further.
Safety Tips to Consider When Using a Trolling Motor on Your Kayak

While using a trolling motor can greatly enhance your kayaking experience, it is essential always to prioritize safety:
1. Wear a life jacket: Regardless of how confident you are in your swimming abilities, wearing a life jacket is crucial for personal safety while out on the water. Accidents can happen unexpectedly, and a life jacket can be a lifesaver.
2. Avoid shallow water and obstacles: Trolling motors are designed for use in deeper waters, so it is important to avoid shallow areas where the propeller could get damaged or cause harm to marine life. Additionally, steer clear of submerged obstacles such as rocks or fallen trees that could damage your motor or kayak.
3. Properly secure the battery and wiring: Ensure that your battery is securely mounted inside a waterproof box to prevent any accidental contact with water. Additionally, use zip ties or adhesive clips to secure wiring along the kayak’s interior, preventing entanglement or damage while in motion.
Conclusion: Enjoying Your Kayak with a Trolling Motor
In conclusion, mounting a trolling motor on my kayak has been one of the best decisions I have made as an outdoor enthusiast. The benefits of increased speed and efficiency, ability to cover more water, reduced fatigue, and improved fishing experience have truly transformed my time spent on the water.
By following this step-by-step guide and considering safety precautions when using a trolling motor on your kayak, you too can enjoy these incredible advantages. So why not embark on this DIY project? Take control of your kayaking adventures today and discover new horizons with ease!
FAQs
What is a trolling motor?
A trolling motor is an electric motor used to propel a boat or kayak at a slow speed, allowing for precise maneuvering and fishing.
Why would I want to mount a trolling motor on my kayak?
Mounting a trolling motor on your kayak can make it easier to navigate through water, especially in windy or choppy conditions. It can also allow you to cover more distance and spend more time fishing without getting tired from paddling.
What materials do I need to mount a trolling motor on my kayak?
You will need a trolling motor, a mounting bracket, a battery, battery box, wiring, and various tools such as a drill, screws, and pliers.
How do I choose the right trolling motor for my kayak?
Consider the weight and size of your kayak, as well as the type of water you will be navigating. A general rule of thumb is to choose a trolling motor with at least 2 pounds of thrust for every 100 pounds of weight.
What are the steps to mount a trolling motor on my kayak?
The five steps are: 1. Choose the location for the motor and bracket 2. Install the bracket 3. Attach the motor to the bracket 4. Install the battery and wiring 5. Test the motor and make any necessary adjustments.
Do I need any special skills or experience to mount a trolling motor on my kayak?
While some basic knowledge of wiring and tools is helpful, the process is relatively straightforward and can be completed by most people with some patience and attention to detail. It is important to follow all safety guidelines and manufacturer instructions.
Originally posted 2024-01-15 10:05:47.